How-To Utilize ElastiFlow and built-in Kibana features to achieve Multi-Tenancy
By: Eric Graham
February 15, 2024
Introduction
In the world of Managed Service Providers (MSPs) and Internet Service Providers (ISPs), enabling customers access to data is a common challenge. Customers often have their own network engineering teams that require network visibility to troubleshoot performance bottlenecks, security events and other network related issues.
One of the advantages of embracing an “open” approach to Network Observability is that you can leverage powerful features of complementary tools. Kibana is a data visualization and exploration tool that many NetOps teams are familiar with. When it is fed with the enhanced network data from ElastiFlow, it can be a powerful solution for understanding and fixing network performance issues. I was recently challenged with helping a customer collaborate with their customers using Kibana. I hadn’t come across this request before, but after some research I was able to craft a solution. This blog post explores a solution for achieving multi-tenancy using ElastiFlow, Elasticsearch and Kibana, leveraging meta-data enrichment, spaces, user and role functions.
ElastiFlow Enrichment of Data
If you are fortunate, the device you are monitoring with flow data already includes a field that can be used as a unique customer identifier. As an example, Calix devices send ONT-ID, which in some cases might be the right choice. ElastiFlow can help as well. Lets say your unique identifier is a subnet or host IP address. You can use ElastiFlow metadata enrichment to match on specific IP information and assign a tag or define a specific customer field. Therefore, you can match on an IP subnet and assign something like a customer name. This could then be used in Kibana within the user role to define what documents within an index a specific customer can access.
Kibana Space Creation
Kibana Spaces enable you to organize your dashboards and other saved objects into categories based on team, use case, individual, or really any way you choose. This feature also comes in handy when you want to restrict access to specific dashboards or saved objects to specific users who have access to a specific Kibana space. For multi-tenancy you don't need to create a space per customer but it is a good way to ensure only certain dashboards and saved objects are visible. It’s even possible to offer a tiered service where certain customers belong to certain spaces where they have increasing visibility depending on their tier. When you are creating a multi-tenant environment it’s a good idea to create a separate space that limits the dashboards and saved objects that your multi-tenant users have access to.
Creating a new space is simple. In your upper left menu bar choose the small space icon and choose “manage spaces”. This will take you to the “Spaces” page where you can create a new space for your customers. Once the space is created you can add whatever dashboards and saved views you want your customers to see. This is an effective way to offer specific visualizations for your customer base. This new space will be used when you define your new user role in step 6 below.
Kibana User and Role Definition
As a Kibana system administrator you have access to define users and roles. The first step is to define a role and choose what each of your customers can access. This includes choosing what information is accessible in the Kibana UI and what specific documents (data) the customer will have access to .
To define a specific role for a multi-tenant solution you need to follow these steps using the Kibana UI as an administrator.
Navigate to Stack Management and select roles under Security.
You will need to create a role with a unique name for each customer.
Under "Index Privileges," choose the indexes accessible to the customer.
Toggle "Grant read privileges to specific documents" to control document visibility.
Define filters such as {"term": { "host.name": "Vyos-Edge-NY" }} to limit document access. In this case we are using the host.name field with a value of Vyos-Edge-NY.
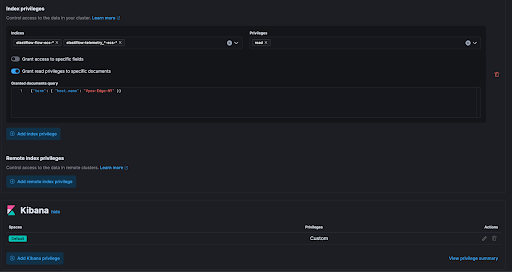
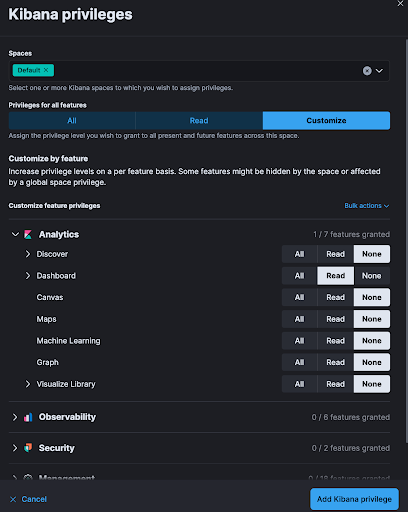
Limit access to Kibana by configuring the new space you created and continue by specifying privileges (e.g., read-only dashboards). This will restrict what Kibana features are available to your customers.
At this point you are ready to create a user and assign the new role you created.
Select “Users” under “Stack Management”, “Security”.
Select “Create users”.
Define all the parameters that you would like and for “Privileges” select the new role you just created.
That's it!! This user will be restricted to only view certain features in Kibana, dashboards and saved views, and only the documents for the indexes and field value you specified.
In addition, this can all be done using Elasticsearch and Kibana APIs, making automation that much easier.
Conclusion
In conclusion, the challenge of providing secure and organized data access to customers in the realm of Managed Service Providers (MSPs) and Internet Service Providers (ISPs) has been effectively addressed through the integration of ElastiFlow, Elasticsearch, and Kibana. The journey from enriching data with unique customer identifiers using ElastiFlow to creating dedicated Kibana spaces has proven to be a robust solution for achieving multi-tenancy. The blog emphasized the importance of metadata enrichment in ElastiFlow, highlighting how specific IP information can be used to assign customer tags and facilitate tailored access controls in Kibana.
Furthermore, the discussion on Kibana spaces illuminated the flexibility it offers in organizing dashboards and saved objects, making it a key component for ensuring that access is appropriately restricted. The tiered service approach, allowing different customers access to distinct spaces based on their tier, adds an extra layer of customization.
The role definition in Kibana, outlined step-by-step for administrators, demonstrated the meticulous process involved in tailoring access privileges for each customer. The blog concludes with a user-friendly guide on creating users, assigning roles, and restricting access, providing a comprehensive solution for achieving efficient multi-tenancy in a Kibana environment. In essence, the combination of ElastiFlow, Elasticsearch, and Kibana, with a focus on spaces and role functions, emerges as a powerful framework for addressing the complexities of data accessibility in network management scenarios.
Stay connected
Sign up to stay connected and receive the latest content and updates from us!