
Automate Your Network Alerts: A Step-by-Step ElastiFlow & Slack Tutorial
By: Alex Degitz
June 10, 2025
Our team at ElastiFlow recently attended AutoCon, where we focused on the crucial role of automation triggers and precise information in end-to-end automation use cases. This event underscored a significant shift in network automation, moving beyond traditional planned changes to embrace more dynamic, event-driven responses.
The Evolution of Network Automation
Historically, network automation has centered mainly on planned configuration changes, such as firmware updates or the rollout of EVPN connections. While these efforts are incredibly valuable, saving network engineers hundreds of hours of manual, error-prone configuration tasks often performed during nightly maintenance windows, they face a persistent challenge: maintaining a single source of truth for network and device configurations.
Network engineers are frequently compelled to make swift, manual changes in response to incidents or outages. These "out-of-band" changes can throw devices "out of sync" with their intended configurations, leading to constant re-synchronization efforts and debates over which configuration is "correct." This friction often hinders further automation initiatives.
The ideal solution involves orchestrating all device configuration changes through a centralized tool that adheres to an "Infrastructure-as-Code" (IaC) approach. These systems typically apply changes by wiping and replacing the entire device configuration, ensuring the proposed change takes effect and erasing any manual modifications.
Unlocking Deeper Automation with Event-Driven Responses
To push more changes through automation tools, it's essential to automate planned configurations and responses to outages, incidents, or even interesting network performance and security events. This is where ElastiFlow makes a significant impact.
ElastiFlow empowers this shift with 130+ open-source machine learning (ML) jobs and the ability to ingest network telemetry and traffic data at any scale. This robust capability allows ElastiFlow to trigger a wide array of actions based on static rules and rare events identified by its powerful AI/ML functions.
Flexible Integration with ElastiFlow’s Open Data Platform
Leveraging an Open Data Platform approach, ElastiFlow primarily relies on the underlying visualization layer for pre-built action triggers, such as Kibana Connectors or OpenSearch Dashboard plugins. Crucially, almost all of these integrations offer webhook capabilities, enabling them to trigger any action that provides an endpoint. This flexibility ensures seamless integration into existing automation workflows.
While the prospect of full end-to-end automation is exciting, we understand it can be daunting for many organizations just beginning their automation journey. Let’s start with a foundational step: demonstrating how to set up an Elastic connector for Slack to send automated messages. This will provide a practical entry point into event-driven automation with ElastiFlow.
Setting up a Slack connector for ElastiFlow on Elasticsearch
From the ElastiFlow dashboard, click on the hamburger menu on the left-hand side and under “Management,” click on “Stack Management”.
Under “Alerts and Insights”, click on “Connectors”.
Click on “Create Connector” and scroll down to “Slack”.
In the next window, you’ll need to provide a name and a webhook for this connector. You’re free to choose any name. For the webhook, you’ll need to create a Slack app and enable incoming webhooks for a specific channel.
Go to https://api.slack.com/apps and click on “Create app”. Choose “from scratch” and choose a name for your app.
Select a Slack workspace (ideally one you have admin access to, otherwise you’ll need an admin to approve your app request) and click “create app”.
Once your app is created, navigate to “incoming webhooks” and enable incoming webhooks. In the open app, you must select the Slack channel you want to receive messages.
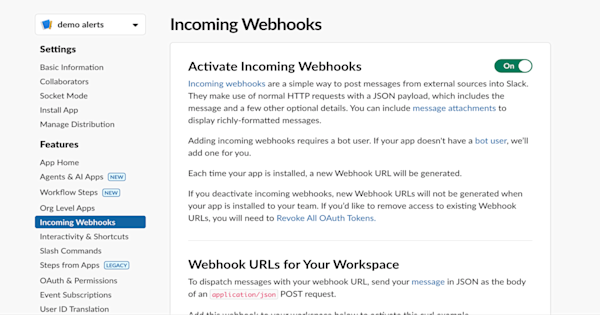
Almost done! Scroll down to the bottom of the page and click on “Copy”. Now we go back to Elastic, and we can paste the webhook into the webhook field of our Slack connector.

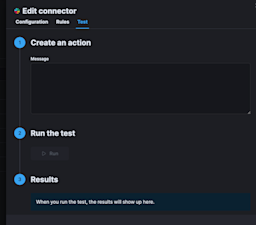
Click on “Save & Test,” which will take you to the screen below. In the message section, type “Hello World” or anything else you like and click “run.” Within a few seconds, you should see your message in the Slack channel you had set up.
Adding the Slack connector to a Rule
Slack is a connector that works with Alerting Rules and Elastic Security. You can create rules either under “Stack Management” -> “Rules” or under “Security” -> “Rules.” For this example, we’ll stay in “Stack Management” and create a simple rule checking for any network conversations with a public actor that has a high threat score, according to the NetIntel Threat Intelligence feed.
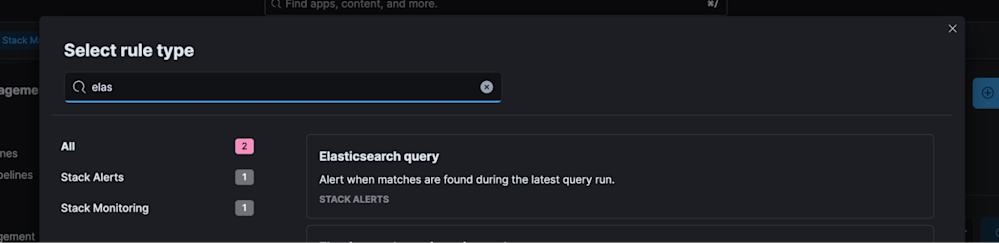
In “Stack Management” -> “Alerts and Insights”, click on “Rules” and “Create Rule”.
As a type, choose “Elasticsearch query”
As query type, select “KQL”. Make sure that the data view “elastiflow-flow-codex-*” (or “elastiflow-flow-ecs-*” if using ECS output) is selected.
As a query, you could define something like “flow.client.sec.threat.score: 21” to get alerts for all connections with the highest possible threat score of 21.
Set the limit to “above or equals 1”, since we want to ensure we get every alert. See screenshot below for a complete example.
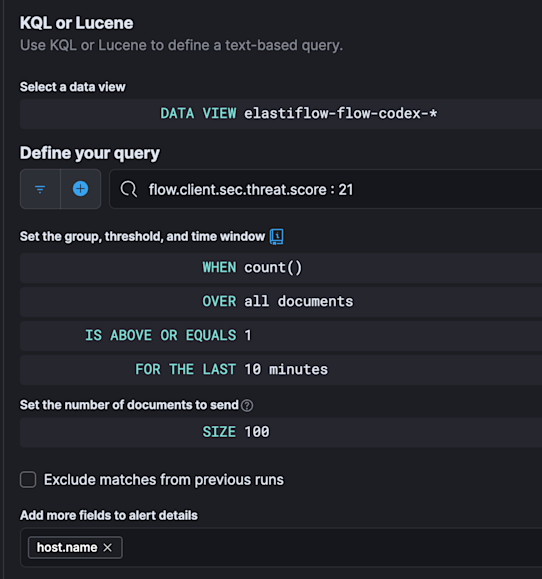
Next, select the run schedule. We usually set this to the same time window as the KQL filter to ensure we don’t have duplicate results. For this example, we’ll run the rule every ten minutes and look for the last ten minutes of data, but this could be set to only a few seconds if you want immediate alerts.
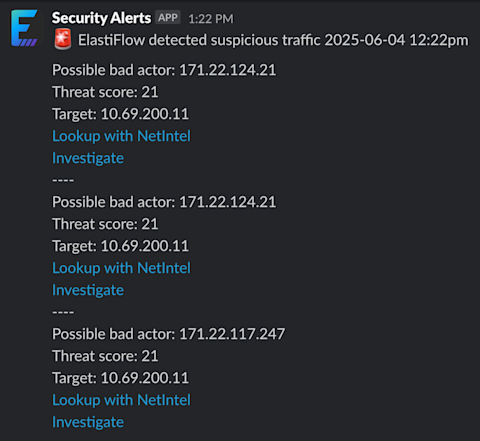
Next, we will add an action. Here, you can select the Slack connector you have just created. We could do an entire blog post on ways to enhance Slack messages, but a lot of documentation is already out there. I’ll just paste an example we use in our demo environment, illustrating what you can do in Slack messages. This message:
1 2 3 4 5 6 7 8:rotating_light: ElastiFlow detected suspicious traffic {{#FormatDate}} {{{context.date}}} ; America/Los_Angeles ; YYYY-MM-DD hh:mma {{/FormatDate}}{{#context.hits}} Possible bad actor: {{_source.src_ip}} Threat score: {{_source.score}} Target: {{_source.dest_ip}} <https://www.elastiflow.com/netintel/search?ip={{_source.src_ip}}|Lookup with NetIntel> <{{kibanaBaseUrl}}/s/{{rule.spaceId}}/app/dashboards#/view/a000b640-3d3e-11eb-bc2c-c5758316d788?_g=(time:(from:'{{_source.from_time}}',to:'{{_source.to_time}}'),filters:!((query:(match:(flow.client.ip.addr:(query:'{{_source.src_ip}}',type:phrase)))),(query:(match:(flow.server.ip.addr:(query:'{{_source.dest_ip}}',type:phrase)))),(query:(match:(flow.client.sec.threat.score:(query:'{{_source.score}}',type:phrase))))))|Investigate> ---- {{/context.hits}}
Will result in this message in Slack:
This helps you create your first automated Slack alerts from ElastiFlow. We invite you to join our ElastiFlow Slack Community to share the automations you are setting up and ask questions on how to set up new ones.
Stay connected
Sign up to stay connected and receive the latest content and updates from us!